D-Jà Vue - README English 🇬🇧
TIP
- 🇧🇷 Ajude na tradução desta documentação
- 🏆 Ajude testando no Windows, MAC ou Linux!
- 🐞 Achou algum problema ou sentiu falta de alguma coisa? Crie uma Issue
💡 Introduction
Why?
We want a workflow and a project structure to make us produtive and make the stakeholders happy. We know we'll make mistakes. Let us make them cheaply.
What is D-Jà Vue?
D-Jà Vue is a project template that will create a folder and files structure that contains two projects, a Django API backend and a VueJS + Vuetify frontend. It can be a great jumpstarting to your next project, Proof of Concept or product idea. It's production-ready where you can focus on the features, core business and generate value.
How?
By answering some questions, you can give the project name and choose things such as the database version, the main model for your project and few other things, then a complete project structure will be created 📂! Then it's possible to start the main feature for your business on the Day one.
Some principles
- Start by building a backend-less frontend
- Start with the output and test the hypothesis
- Deploy early, deploy often
- TDD is the fastest way
- More infor and references here:
Want to know more?
- 💬 Have a question?
- 🐞 Found a problem?
- 🏆 Do you want to contribute?
- 🌟 Did you like it? Considere a star in the github repo
🛠️ D-Jà Vue template requirements
To use the Djavue to create your project, you'll need only:
- 🐍 Python +3.10
- 🍪 Cookiecutter +1.7
To Run everything (the project created), you can choose to two ways 🍨:
- Using Docker 🐋: Docker and Docker compose
- Without Docker 📦: Python for the backend and Node JS for the frontend
📦 Creating my first project using D-Jà Vue
First, get cookiecutter. It's awesome:
pip install "cookiecutter>=1.7.0"pip install "cookiecutter>=1.7.0"TIP
🌈 TIPS/TRICKS: You can use pipx to install cookiecutter globally or creating a pyenv env and set the envs orders and avoiding installing directly in your machine without environments.
Now run it against the D-Jà Vue repositoty. You'll be prompted for some values. Provide them based on your needs!
INFO
👉 Mainly if you are not using Docker and want to use the same Python you have in your machine, use python -V to get your current python version. You also can do the same thing for the the NodeJS version node --version.
cookiecutter https://github.com/evolutio/djavue3cookiecutter https://github.com/evolutio/djavue3Answer the prompts with your own desired flavours. For example:
❯ cookiecutter https://github.com/evolutio/djavue3
  [1/27] project_name (My Todo List): Twitter Clone
  [2/27] project_slug (twitterclone):
  [3/27] description (The Ultimate Django and Vue Template): My first Djavue template
  [4/27] app_name (core): posts
  [5/27] model (Tasks): Tweets
  [6/27] model_lower (tweets):
  [7/27] model_singular (Tweet):
  [8/27] model_singular_lower (tweet):
  [9/27] Select python_version
    1 - 3.9
    2 - 3.10
    3 - 3.11
    Choose from [1/2/3] (1): 2
  [10/27] Select package_manager
    1 - requirements.txt
    2 - pip-tools
    3 - poetry
    Choose from [1/2/3] (1): 1
  [11/27] Select python_linter
    1 - flake8
    2 - pylint
    3 - ruff
    Choose from [1/2/3] (1):
  [12/27] Select django_api
    1 - 🦄 django_only
    2 - 🥷 django_ninja
    3 - 📄 openapi
    Choose from [1/2/3] (1): 2
  [13/27] Select database_version
    1 - postgres:15-alpine
    2 - postgres:14-alpine
    3 - postgres:13.3-alpine
    4 - postgis/postgis:14-3.2-alpine
    Choose from [1/2/3/4] (1):
  [14/27] use_sqlite_local_env (no): yes
  [15/27] Select node_version
    1 - 18.18
    2 - 16.17
    3 - 14.14
    Choose from [1/2/3] (1): 2
  [16/27] Select pages_folder_name
    1 - views
    2 - pages
    Choose from [1/2] (1): 2
  [17/27] Select api_mock
    1 - mirageJS
    2 - express
    Choose from [1/2] (1):
  [18/27] use_github_actions_CI (yes):
  [19/27] keep_vscode_settings (yes):
  [20/27] keep_vscode_devcontainer (no):
  [21/27] Select docker_usage
    1 - 🐳 use docker by default
    2 - 📦 use venv npm by default
    Choose from [1/2] (1): 2
  [22/27] Select deploy_to
    1 - None
    2 - fly.io
    Choose from [1/2] (1):
  [23/27] deploy_domain (twitterclone.fly.dev):
  [24/27] author_name (Roger Camargo):
  [25/27] email (roger-camargo@example.com):
  [26/27] version (0.1.0):
  [27/27] Select license
    1 - MIT
    2 - agpl-3.0
    Choose from [1/2] (1):

 [SUCCESS]: 🐍 Your Django API backend is created! (root) ✨ 🍰 ✨
 [SUCCESS]: 🍰 Your Vue 3 frontend is created! (frontend folder) ✨ 🍰 ✨

What's next?
  cd twitterclone
  👉 For DOCKER users 🐳
       docker compose build
       docker compose up
       go to http://localhost  (PORT is NOT necessary)
  👉 Using virtualenv 📦
       create a virtualenv
       install dependencies

  📄 for more information
       https://djavue3.vercel.app
❯ cookiecutter https://github.com/evolutio/djavue3
[1/27] project_name (My Todo List): Twitter Clone
[2/27] project_slug (twitterclone):
[3/27] description (The Ultimate Django and Vue Template): My first Djavue template
[4/27] app_name (core): posts
[5/27] model (Tasks): Tweets
[6/27] model_lower (tweets):
[7/27] model_singular (Tweet):
[8/27] model_singular_lower (tweet):
[9/27] Select python_version
1 - 3.9
2 - 3.10
3 - 3.11
Choose from [1/2/3] (1): 2
[10/27] Select package_manager
1 - requirements.txt
2 - pip-tools
3 - poetry
Choose from [1/2/3] (1): 1
[11/27] Select python_linter
1 - flake8
2 - pylint
3 - ruff
Choose from [1/2/3] (1):
[12/27] Select django_api
1 - 🦄 django_only
2 - 🥷 django_ninja
3 - 📄 openapi
Choose from [1/2/3] (1): 2
[13/27] Select database_version
1 - postgres:15-alpine
2 - postgres:14-alpine
3 - postgres:13.3-alpine
4 - postgis/postgis:14-3.2-alpine
Choose from [1/2/3/4] (1):
[14/27] use_sqlite_local_env (no): yes
[15/27] Select node_version
1 - 18.18
2 - 16.17
3 - 14.14
Choose from [1/2/3] (1): 2
[16/27] Select pages_folder_name
1 - views
2 - pages
Choose from [1/2] (1): 2
[17/27] Select api_mock
1 - mirageJS
2 - express
Choose from [1/2] (1):
[18/27] use_github_actions_CI (yes):
[19/27] keep_vscode_settings (yes):
[20/27] keep_vscode_devcontainer (no):
[21/27] Select docker_usage
1 - 🐳 use docker by default
2 - 📦 use venv npm by default
Choose from [1/2] (1): 2
[22/27] Select deploy_to
1 - None
2 - fly.io
Choose from [1/2] (1):
[23/27] deploy_domain (twitterclone.fly.dev):
[24/27] author_name (Roger Camargo):
[25/27] email (roger-camargo@example.com):
[26/27] version (0.1.0):
[27/27] Select license
1 - MIT
2 - agpl-3.0
Choose from [1/2] (1):
[SUCCESS]: 🐍 Your Django API backend is created! (root) ✨ 🍰 ✨
[SUCCESS]: 🍰 Your Vue 3 frontend is created! (frontend folder) ✨ 🍰 ✨
What's next?
cd twitterclone
👉 For DOCKER users 🐳
docker compose build
docker compose up
go to http://localhost (PORT is NOT necessary)
👉 Using virtualenv 📦
create a virtualenv
install dependencies
📄 for more information
https://djavue3.vercel.appDONE!! 🎉🎉 Your first project structure is created! You can open the folder twitterclone and check it out!
What's next? The next step is to run it locally and make sure everything is working! Then you can start working on the next important feature to your product or idea!✨
Basically, there are two ways to RUN your project, for the above project we answered to RUN (initially) WITHOUT DOCKER, however, by changing the environment variables (.env file) we can change it any time to RUN USING DOCKER 🐋
Keep reading to understand the difference!
WARNING
⚠️ This is a "Twitter Clone" in terms of UI, the architecture and system design is far way what the real twitter contains. This still a simple frontend and backend API CRUD web app.
🐋 Run locally using Docker vs not using Docker (containers)
Using containers (docker) it’s a convenient mode where it aims to have all dependencies as it is in production included and zero configuration, it does not install things in the local machine, by installing just one dependency (docker) you can run as much closer as possible as it runs in production by running one command. It's the best way to run everything locally and give a good developer experience.
INFO
Using 🐋 Docker is the way where you can have a project that have many dependencies internally (libs, frameworks and also SO dependencies) and externally for example database, web mail server, queue manager etc and RUN everything with ONE CLICK. It's quite common developers work on multiple projects, which one uses different Python and Database versions, by managing those matrix of possible each time you swap a project could be a nightmare! The container concept is here to save us!
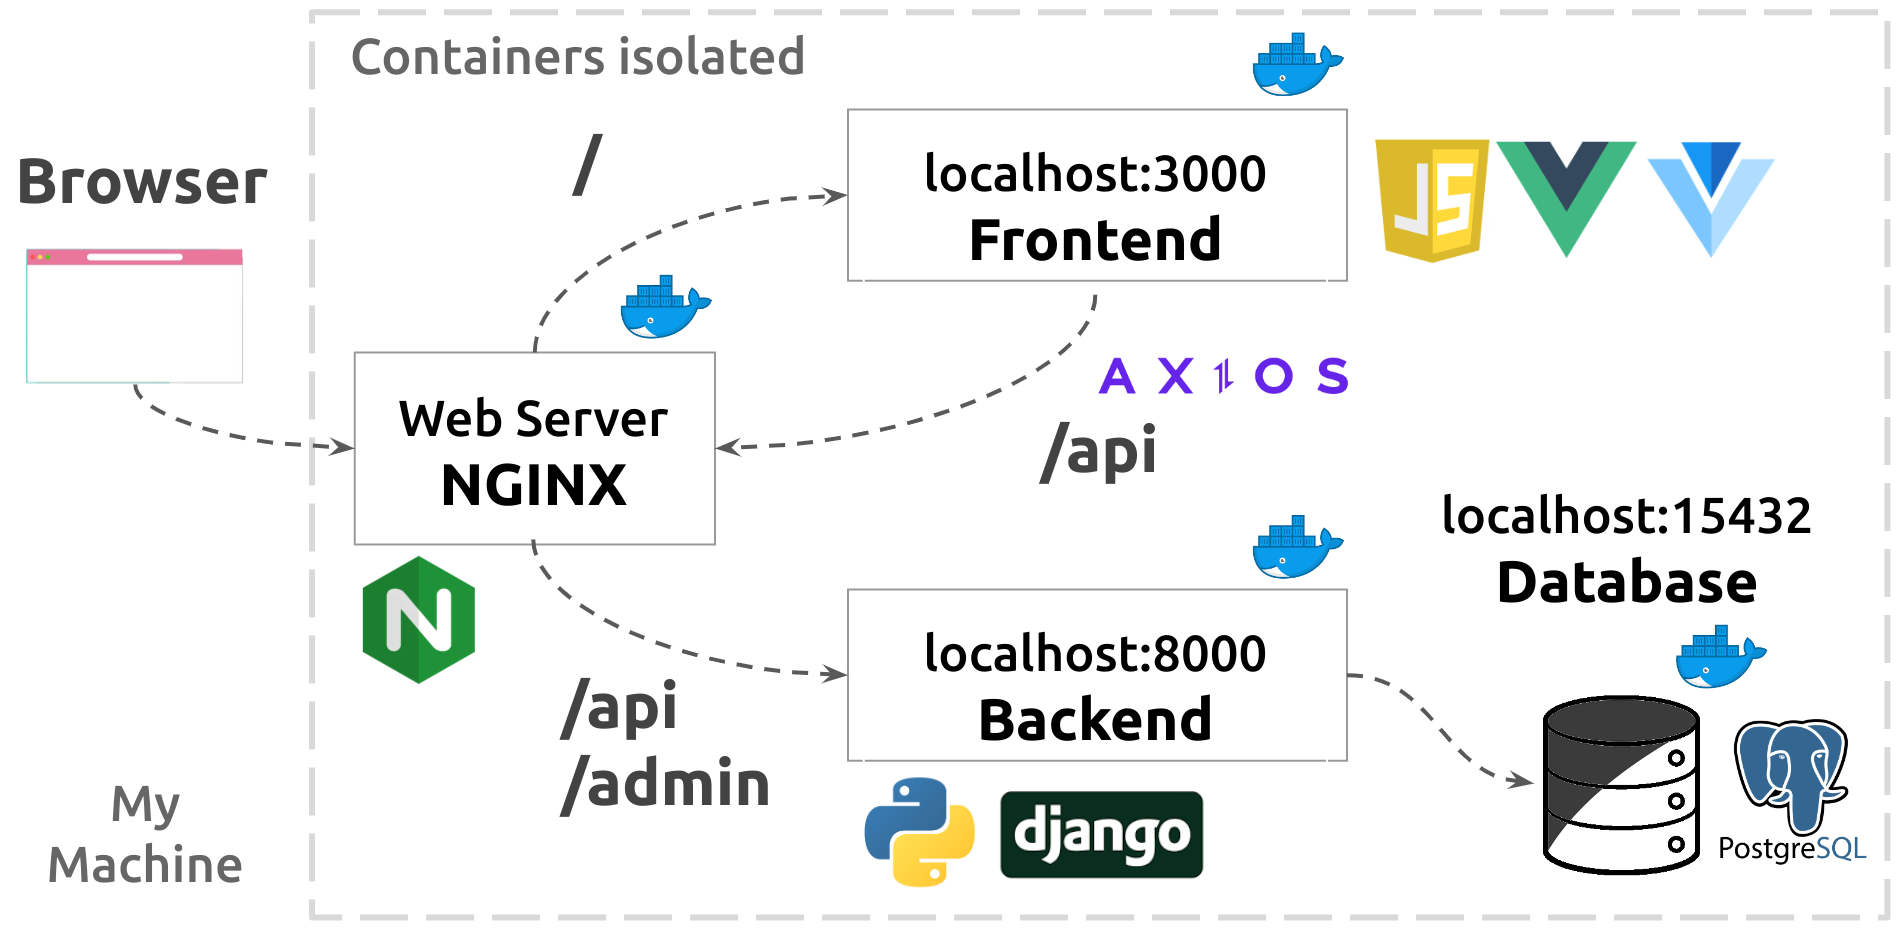
Using the D-Jà Vue template, your project will have the container concept from the Day 1, whether you will start without it or not, being ready to run it with docker is a good thing, mainly to make the devops better (a.k.a deploy to production)
📦 Running without docker can be pretty handy too, it can be much easier to debug, however, it’s necessary to create a virtual environment, install all dependencies in both the backend and frontend projects and have few extra configurations to make the frontend access the backend (CORS settings). It will depend on the developer using tools such as NVM and Pyenv in order to make the local machine be in the same node and python version as the production will.
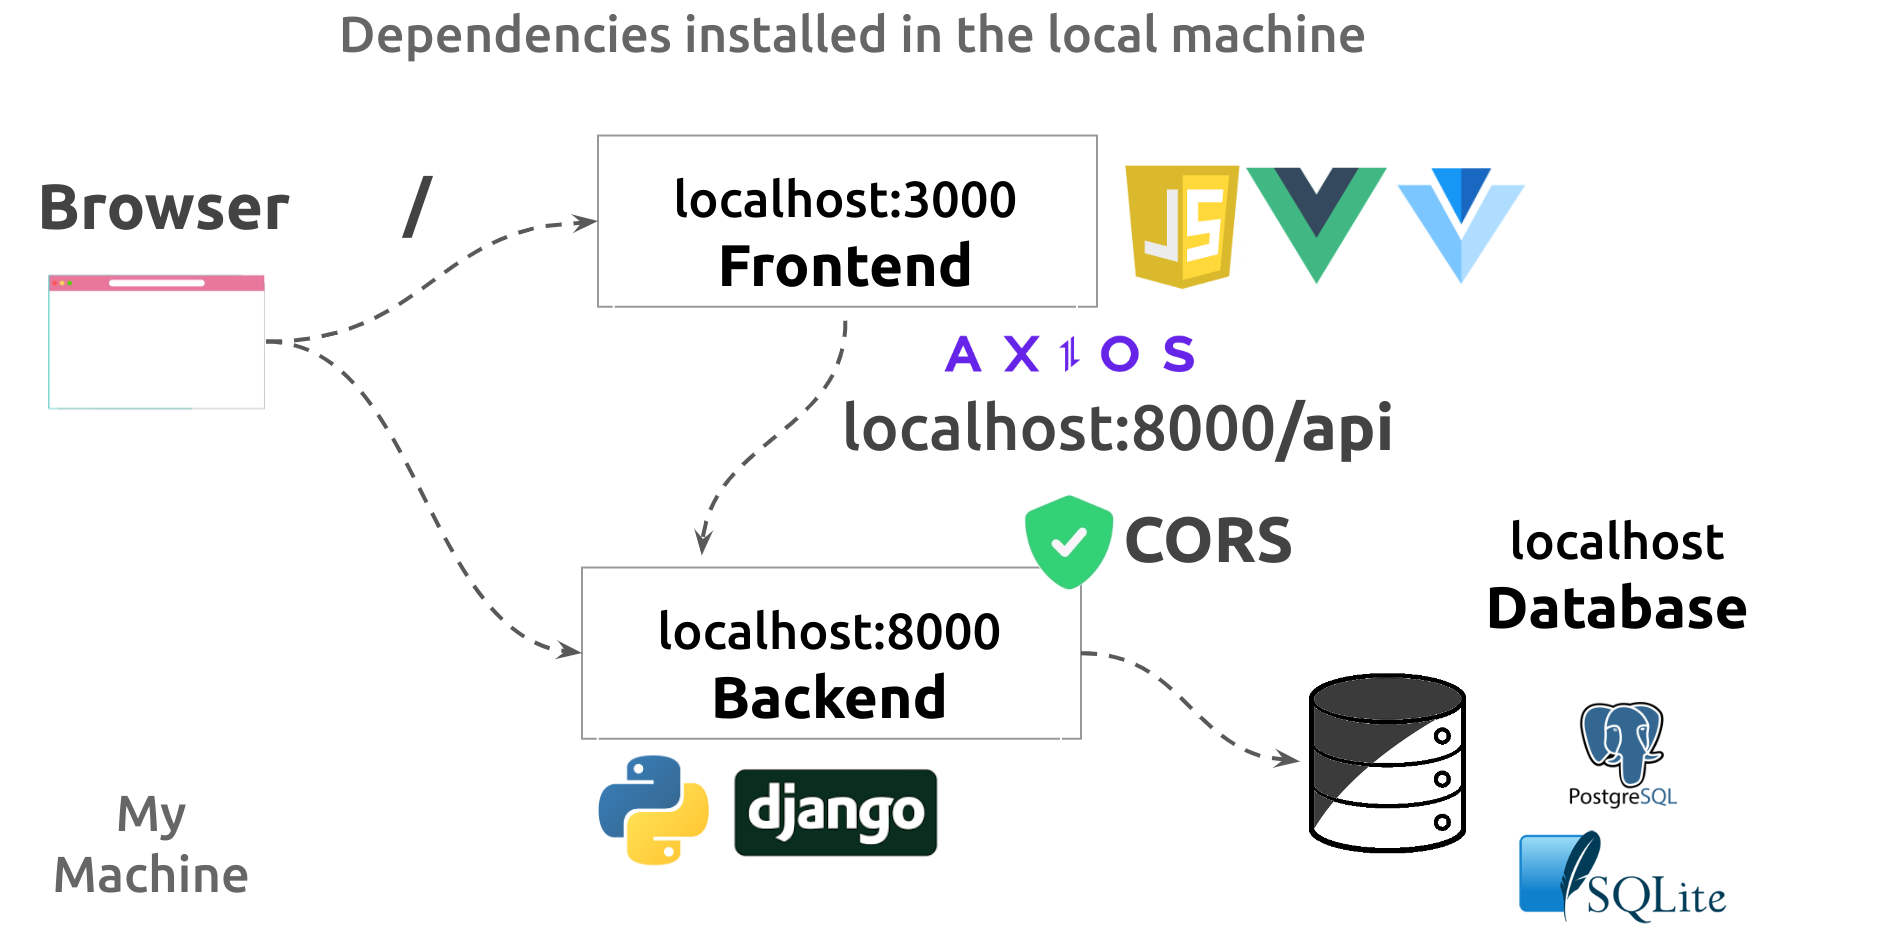
The good thing is that D-Jà Vue template is using a good foundation to make the developer experience as better as possible whether choosing non friction environment with no docker at all, for example, running a SQLite database locally and any python version available or mixing by running just the postgres database inside a container and of course, being as close as possible from what will run in production, for example, having the web server or any other external service that the project might integrate with.
📦 Running the 🦄 backend without docker
Requirements:
- Git
- Python +3.9 (for the backend)
- Node JS +14 (for the frontend - in the next step)
- A shell (it can be a linux terminal, a WSL Terminal on Windows or a PowerShell), ⚠️ PowerShell might have few differences in the commands
TIP
You can use any Python version, however, in an ideal world it's better using locally the same Python version that will be used on Production. That's why you were prompt to choosed one. It's possible to check the prod version (and change it when necessary) by openning the Dockerfile.
Let's use the twitterclone project created in the former step, it's necessary enter inside the project root folder
cd twitterclone/cd twitterclone/Then let's create a python virtual environment for the backend and install the dependencies:
WARNING
⚠️ Don't forget to activate the environment (source .venv/bin/activate), by not doing it, the dependencies will be installed inside your machine rather than inside the virtualenv.
python -m venv .venv
source .venv/bin/activate
pip install -r requirements-dev.txt
python -m venv .venv
source .venv/bin/activate
pip install -r requirements-dev.txtThe Python environment is ready, you can use pip freeze and check all python dependencies installed. One good thing to do in this moment is to run the code style formatter which guarantee all the code are correct.
black twitterclone/black twitterclone/INFO
👉 Remember the name twitterclone/ can be different based on the answer you gave for the project name
Now, it's time to run the migrations, in other words, create the initial tables (based on the models) inside the database. Basically the models that Django has, such us, Users and Sessions and also the initial model for our project, in our case the Tweets table. The migrate django command will read all existing migrations and create the related tables.
INFO
For this project, the default database is SQLite due to we answered yes and 2 for the following prompts:
  ...
  [14/27] use_sqlite_local_env (no): yes
  ...
  [21/27] Select docker_usage
    1 - 🐳 use docker by default
    2 - 📦 use venv npm by default
    Choose from [1/2] (1): 2
  ...
...
[14/27] use_sqlite_local_env (no): yes
...
[21/27] Select docker_usage
1 - 🐳 use docker by default
2 - 📦 use venv npm by default
Choose from [1/2] (1): 2
...👉 If you need to change it to Postgres, don't forget you DON'T need to recreate the project again, you'll just need to change the .envfile
Run the migrations for all django apps:
./manage.py migrate./manage.py migrateAs soon as we have our database created, let's create a new user:
./manage.py createsuperuser
Usuário: admin
Endereço de email: admin@example.br
Password: **********
Password (again): **********
Superuser created successfully.
./manage.py createsuperuser
Usuário: admin
Endereço de email: admin@example.br
Password: **********
Password (again): **********
Superuser created successfully.Finally we can run the project locally:
./manage.py runserver
Watching for file changes with StatReloader
Performing system checks...

System check identified no issues (0 silenced).
October 17, 2023 - 08:39:10
Django version 4.1.7, using settings 'dashboardtarget.dashboardtarget.settings'
Starting development server at http://127.0.0.1:8000/
Quit the server with CONTROL-C.
./manage.py runserver
Watching for file changes with StatReloader
Performing system checks...
System check identified no issues (0 silenced).
October 17, 2023 - 08:39:10
Django version 4.1.7, using settings 'dashboardtarget.dashboardtarget.settings'
Starting development server at http://127.0.0.1:8000/
Quit the server with CONTROL-C.👉 Open your browser and access the http://localhost:8000, the application should be running

Other things that you can do at this point:
- Access the
http://localhost:8000/adminand after the login (using the user we created before) play with the Django Admin - Run the command
pytestand run all the backend tests - Run the command
./manage.py shell_plus --ipython --print-sqland run code such asTweet.objects.all()andTweet.objects.create(description="My first post using djavue")
INFO
👉 Remember the name Tweet in the code Tweet.objects.all() is the model name you answered and might be different for your case.
- Access the
http://localhost:8000/api/docsand check the API Documentation out - Access the
http://localhost:8000/api/posts/tweets/listand get the list of tweets using the backend api
INFO
👉 Again, the posts and tweets can be different based on your answers from app_name and model_name.
INFO
👉 If you got the response: {"detail": "Unauthorized"} for the http://localhost:8000/api/posts/tweets/list, you can access http://localhost:8000/admin/login/ and login using the user you created using the command createsuperuser and try it again.
📦 Running the ⚡️ frontend without docker
Requirements:
- Git
- Node JS +14 (for the frontend)
- A shell (it can be a linux terminal, a WSL Terminal on Windows or a PowerShell), ⚠️ PowerShell might have few differences in the commands
- The backend up running
Open a second terminal (the first one should be running the backend). Navigate inside the project folder root and then inside the frontend folder.
cd twitterclone/frontend/cd twitterclone/frontend/Use the npm to install all the frontend project dependencies. Note that those dependencies are listed inside the package.json file. Note also that the "environment" for this project, like the .venv folder created that stored all the dependencies for the backend, for frontend projects, this folder is node_modules and we don't need to create or inform anything. By default this folder will be created after running the following command.
npm installnpm installNow let’s run the frontend using vite
npm run dev
  VITE v4.4.11  ready in 669 ms
  ➜  Local:   http://localhost:3000/
  ➜  Network: use --host to expose
  ➜  press h to show help
npm run dev
VITE v4.4.11 ready in 669 ms
➜ Local: http://localhost:3000/
➜ Network: use --host to expose
➜ press h to show helpDONE!! 🎉🎉 The frontend is running
👉 Open your browser and access the http://localhost:3000 (or your machine IP + the port if with the --host) to request the frontend application! It should be running now!
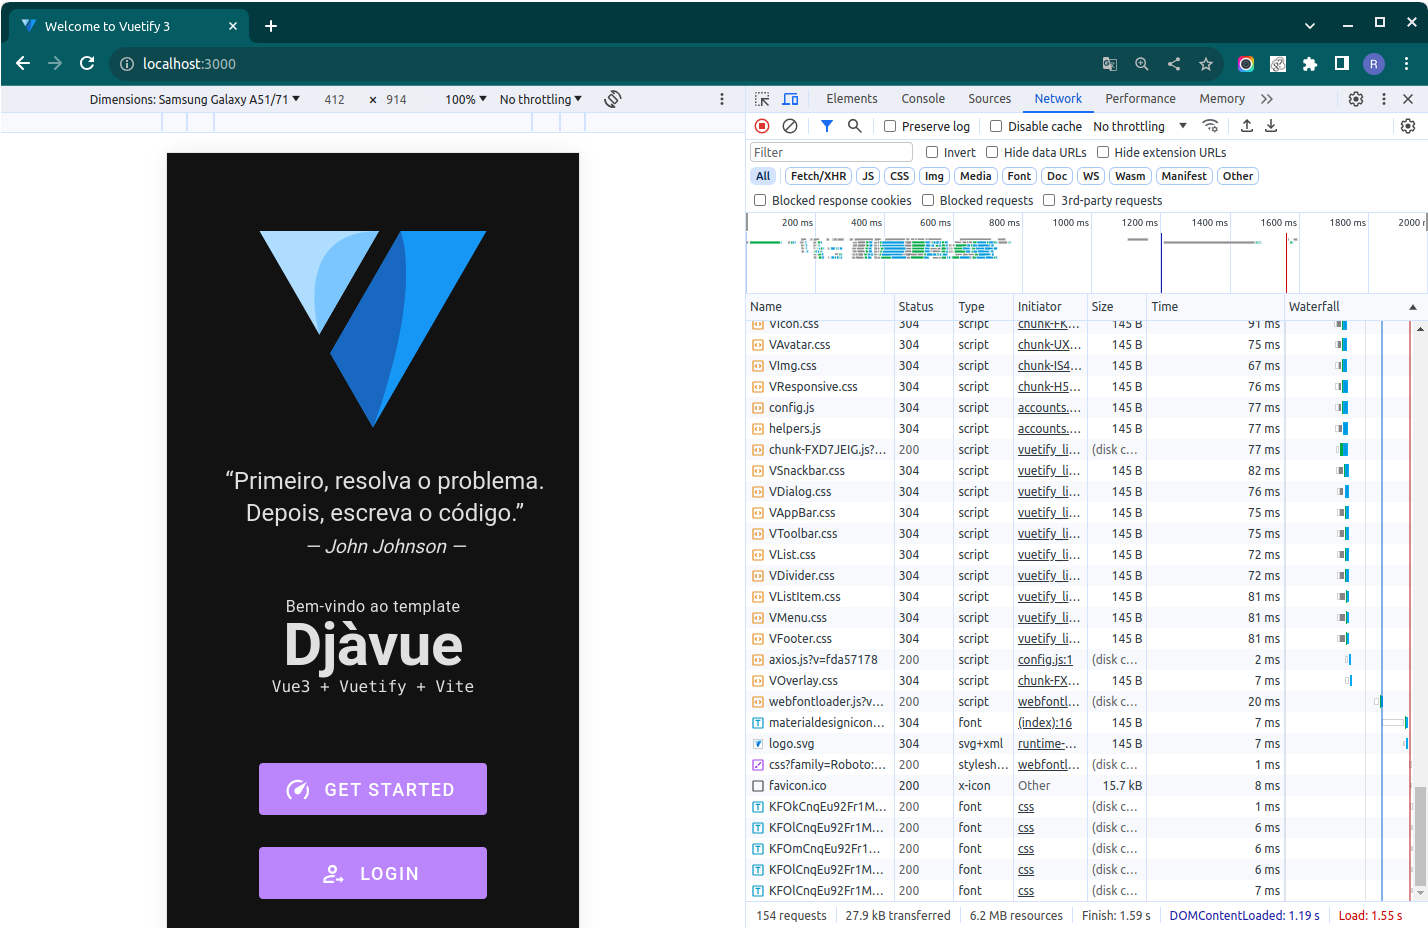
INFO
📱 The D-Jà Vue template aims to be mobile first.
TIP
🌈 TIPS/TRICKS: Alternatively we can use the command npm run dev -- --host which will make the application available for your network, in this way you can use your machine IP address and access it from any other machine or mobile within the same WIFI network.
TIP
You can use any Node JS version, however, in a ideal world it better using locally the same Node JS version that will be used on Production. That's why you were prompt ans choosed one version. It's possible to check the prod version (and change it if necessary) by openning the frontend/Dockerfile.
Other things that you can do at this point:
- Use
npm run formatto run the code formatter (Prettier) and fix some possible formating style problems - Use
npm run lintto run the linter and check if some code is not following the rules - Use
npm run test:unitto run the frontend tests - Use
npm run buildwhich will generate thedistfolder that contains the final html+css+js to published
🐞 Debugging the Django API
🚧 TODO
You can help here!
🐞 Debugging the VueJS web
🚧 TODO
You can help here!
🐋 Running all with docker
Requirements:
- Docker version >= 24.0.2 (in any S.O. you have)
- Docker Compose version >= v2.18.1
- A shell (it can be a linux terminal, a WSL Terminal on Windows or a PowerShell), ⚠️ PowerShell might have few differences in the commands
The way the application behaves in runtime is based on the settings for a given environment and following the 12 factors, in this way, it can connect to a sqllite db or a postgres, it can be in a debug mode or not. Everything can be changed just by changing one or more environment variables without changing any code. The file that keeps all variables and can be changed is the .env file
To change from running locally using virtual environment (as we saw before and what was answered in the template prompt) to run everything in containers (docker), we must change some values inside the .env
DEBUG=True
SECRET_KEY='cria-um-segredo-qualquer'
LANGUAGE_CODE=pt-br
TIME_ZONE=America/Sao_Paulo

POSTGRES_DB=db_posts
POSTGRES_USER=posts
POSTGRES_PASSWORD=posts

# ⚠️ AVISO
# É possível alterar entre COM DOCKER ou SEM DOCKER conforme as configurações abaixo

## 🖥️  Para uso local via virtualenv
POSTGRES_HOST=localhost
POSTGRES_PORT=15432
# DATABASE_URL=postgres://posts:posts@localhost:15432/db_posts
DATABASE_URL=sqlite:///db_local.sqlite3

## 🐳 Para uso via container/Docker
# POSTGRES_HOST=postgres
# POSTGRES_PORT=5432
# DATABASE_URL=postgres://posts:posts@postgres:5432/db_postsDEBUG=True
SECRET_KEY='cria-um-segredo-qualquer'
LANGUAGE_CODE=pt-br
TIME_ZONE=America/Sao_Paulo
POSTGRES_DB=db_posts
POSTGRES_USER=posts
POSTGRES_PASSWORD=posts
# ⚠️ AVISO
# É possível alterar entre COM DOCKER ou SEM DOCKER conforme as configurações abaixo
## 🖥️ Para uso local via virtualenv
POSTGRES_HOST=localhost
POSTGRES_PORT=15432
# DATABASE_URL=postgres://posts:posts@localhost:15432/db_posts
DATABASE_URL=sqlite:///db_local.sqlite3
## 🐳 Para uso via container/Docker
# POSTGRES_HOST=postgres
# POSTGRES_PORT=5432
# DATABASE_URL=postgres://posts:posts@postgres:5432/db_postsDEBUG=True
SECRET_KEY='cria-um-segredo-qualquer'
LANGUAGE_CODE=pt-br
TIME_ZONE=America/Sao_Paulo
POSTGRES_DB=db_posts
POSTGRES_USER=posts
POSTGRES_PASSWORD=posts
# ⚠️ AVISO
# É possível alterar entre COM DOCKER ou SEM DOCKER conforme as configurações abaixo
## 🖥️ Para uso local via virtualenv
# POSTGRES_HOST=localhost
# POSTGRES_PORT=15432
# DATABASE_URL=postgres://posts:posts@localhost:15432/db_posts
# DATABASE_URL=sqlite:///db_local.sqlite3
## 🐳 Para uso via container/Docker
POSTGRES_HOST=postgres
POSTGRES_PORT=5432
DATABASE_URL=postgres://posts:posts@postgres:5432/db_postsDEBUG=True
SECRET_KEY='cria-um-segredo-qualquer'
LANGUAGE_CODE=pt-br
TIME_ZONE=America/Sao_Paulo
POSTGRES_DB=db_posts
POSTGRES_USER=posts
POSTGRES_PASSWORD=posts
# ⚠️ AVISO
# É possível alterar entre COM DOCKER ou SEM DOCKER conforme as configurações abaixo
## 🖥️ Para uso local via virtualenv
# POSTGRES_HOST=localhost
# POSTGRES_PORT=15432
# DATABASE_URL=postgres://posts:posts@localhost:15432/db_posts
# DATABASE_URL=sqlite:///db_local.sqlite3
## 🐳 Para uso via container/Docker
POSTGRES_HOST=postgres
POSTGRES_PORT=5432
DATABASE_URL=postgres://posts:posts@postgres:5432/db_postsINFO
👉 For an existing project, we can change the .env OR for a new template, we can answer as below:
  ...
  [14/27] use_sqlite_local_env (no): no
  ...
  [21/27] Select docker_usage
    1 - 🐳 use docker by default
    2 - 📦 use venv npm by default
    Choose from [1/2] (1): 1
  ...
...
[14/27] use_sqlite_local_env (no): no
...
[21/27] Select docker_usage
1 - 🐳 use docker by default
2 - 📦 use venv npm by default
Choose from [1/2] (1): 1
...First, independently which directory you are, type the following command to make sure there is no container running
docker ps

CONTAINER ID   IMAGE  COMMAND      CREATED       STATUS                PORTS
docker ps
CONTAINER ID IMAGE COMMAND CREATED STATUS PORTSINFO
👉 If you have something running, you'll need to stop everything by using the command docker stop [CONTAINER ID]
Then make sure you are inside the project root
cd twitterclone/cd twitterclone/If you already run locally the frontend project, probably there are the node_modules folder which was created when you installed the dependencies. So you'll need to delete it
rm -rf frontend/node_modulesrm -rf frontend/node_modulesEnter the following command to build and run everything:
docker compose up -ddocker compose up -dAfter downloading the image layers and building everything, by running again the command docker ps, it should list four containers up running:
docker ps

CONTAINER ID  IMAGE COMMAND                 STATUS         PORTS        NAMES
1851a43bd     nginx "/docker..."            Up 10 minutes  80->7999     dashboardbeta-nginx-1
e5c00ed78     back-dashboard "bash -..."    Up 10 minutes  8000->8000   dashboardbeta-backend-1
078029b2b     front-dashboard "docker..."   Up 10 minutes  3000->3000   dashboardbeta-frontend-1
3f0949de3     postgres:13.3 "docker..."     Up 10 minutes  15432->5432  dashboardbeta-postgres-1
docker ps
CONTAINER ID IMAGE COMMAND STATUS PORTS NAMES
1851a43bd nginx "/docker..." Up 10 minutes 80->7999 dashboardbeta-nginx-1
e5c00ed78 back-dashboard "bash -..." Up 10 minutes 8000->8000 dashboardbeta-backend-1
078029b2b front-dashboard "docker..." Up 10 minutes 3000->3000 dashboardbeta-frontend-1
3f0949de3 postgres:13.3 "docker..." Up 10 minutes 15432->5432 dashboardbeta-postgres-1Those container are running because they are described inside the docker-compose.yaml file as below
services:

  backend:
    image: back-twitterclone
    hostname: back-twitterclone
    build:
      context: ./
      dockerfile: Dockerfile
    env_file:
      - .env
    command: bash -c "python manage.py migrate && python manage.py runserver 0.0.0.0:8000"
    ports:
      - 8000:8000
...

  postgres:
    image: "postgres:15-alpine"
    ports:
      - 15432:5432
    volumes:
      - postgres_data:/var/lib/postgresql/data
    env_file:
      - .env
...

  frontend:
    build:
      context: ./frontend
    image: front-twitterclone
    command: npm run dev -- --host
    expose:
      - "3000"
...

  nginx:
    image: nginx
    ports:
      - 80:7999
    volumes:
- ./docker/nginx/default_local:/etc/nginx/conf.d/default.confservices:
backend:
image: back-twitterclone
hostname: back-twitterclone
build:
context: ./
dockerfile: Dockerfile
env_file:
- .env
command: bash -c "python manage.py migrate && python manage.py runserver 0.0.0.0:8000"
ports:
- 8000:8000
...
postgres:
image: "postgres:15-alpine"
ports:
- 15432:5432
volumes:
- postgres_data:/var/lib/postgresql/data
env_file:
- .env
...
frontend:
build:
context: ./frontend
image: front-twitterclone
command: npm run dev -- --host
expose:
- "3000"
...
nginx:
image: nginx
ports:
- 80:7999
volumes:
- ./docker/nginx/default_local:/etc/nginx/conf.d/default.confDONE!! 🎉🎉 The containers are ready to use
👉 Open your browser and access frontend at http://localhost, remember we do have a web server in front of the frontend, so if you access http://localhost:3000 instead of http://localhost it will show the page, however, it WONT WORK as expected.
WARNING
- ✅ Use
http://localhost - ⛔ Don't use
http://localhost:3000
You also can access the backend container and create a user as we did without docker. So open a terminal inside the backend container by the following command:
docker compose exec -it backend bashdocker compose exec -it backend bashOnce inside the container, use the normal django commands, for example the create super user:
root@back-dashboardtarget:/app# ./manage.py createsuperuser
Usuário: admin
Endereço de email: admin@example.com
Password: **********
Password (again): **********
Superuser created successfully.
root@back-dashboardtarget:/app# ./manage.py createsuperuser
Usuário: admin
Endereço de email: admin@example.com
Password: **********
Password (again): **********
Superuser created successfully.Use CTRL+D or type exitto finish the terminal and go back to host terminal
Other things that you can do at this point:
- Use
docker compose exec -it [container-name] [command]and execute any command inside any container (backend|postgres|frontend|nginx) - Use
docker compose downto stop all containers - Use
docker compose logs -f [container-name]to check out the output from one of the containers. Note: if one of the containers didn't run, it's possible to use this command and see the error/cause the container didn't get up.
📦 Package Management with requirements
🚧 TODO
You can help here!
📦 Package Management with Poetry
Requirements:
- Check the requirements for the chapter 📦 Creating my first project using D-Jà Vue
- Poetry installed
Let's recreate the twitterclone like it was done in the 📦 Creating my first project using D-Jà Vue but now choosing Poetry
INFO
👉 This step has less details due to the links above has more information.
Run the cookiecutter command against the D-Jà Vue repositoty. You'll be prompted for some values. Provide them based on your needs and choose 'Poetry' for the 'package_manager':
cookiecutter https://github.com/evolutio/djavue3cookiecutter https://github.com/evolutio/djavue3Answer the prompts with your own desired flavours. For example:
❯ cookiecutter https://github.com/evolutio/djavue3
  [1/27] project_name (My Todo List): Twitter Clone
  [2/27] project_slug (twitterclone):
  [3/27] description (The Ultimate Django and Vue Template): My first Djavue template using Poetry
  [4/27] app_name (core): posts
  [5/27] model (Tasks): Tweets
  [6/27] model_lower (tweets):
...
  [10/27] Select package_manager
    1 - requirements.txt
    2 - pip-tools
    3 - poetry
    Choose from [1/2/3] (1): 3          👈
...
  [14/27] use_sqlite_local_env (no): yes
...
  [21/27] Select docker_usage
    1 - 🐳 use docker by default
    2 - 📦 use venv npm by default      👈
    Choose from [1/2] (1): 2
...
 [SUCCESS]: 🐍 Your Django API backend is created! (root) ✨ 🍰 ✨
 [SUCCESS]: 🍰 Your Vue 3 frontend is created! (frontend folder) ✨ 🍰 ✨
...
❯ cookiecutter https://github.com/evolutio/djavue3
[1/27] project_name (My Todo List): Twitter Clone
[2/27] project_slug (twitterclone):
[3/27] description (The Ultimate Django and Vue Template): My first Djavue template using Poetry
[4/27] app_name (core): posts
[5/27] model (Tasks): Tweets
[6/27] model_lower (tweets):
...
[10/27] Select package_manager
1 - requirements.txt
2 - pip-tools
3 - poetry
Choose from [1/2/3] (1): 3 👈
...
[14/27] use_sqlite_local_env (no): yes
...
[21/27] Select docker_usage
1 - 🐳 use docker by default
2 - 📦 use venv npm by default 👈
Choose from [1/2] (1): 2
...
[SUCCESS]: 🐍 Your Django API backend is created! (root) ✨ 🍰 ✨
[SUCCESS]: 🍰 Your Vue 3 frontend is created! (frontend folder) ✨ 🍰 ✨
...DONE!! 🎉🎉 The project structure is created! You can open the folder twitterclone and check it out!
cd twitterclone/cd twitterclone/Then let's tell Poetry to create the virtual environment inside de project:
poetry config virtualenvs.in-project truepoetry config virtualenvs.in-project trueThen install de project dependencies using Poetry:
poetry installpoetry installINFO
👉 Differently from virtualenv, Poetry will create and install the dependencies inside the virtual environment whitout it being active.
To run the backend, it will be necessary to active the environment using the following command:
poetry shellpoetry shellNow the environment is ready and it's possible to execute the migrations and the run server. Check more details following the steps over the chapter 📦 Creating my first project using D-Jà Vue
Other things that you can do at this point:
- Use
poetry env info,poetry env info -pandpoetry env listto check more details about the virtual environment created by Poetry - Use
poetry add [some-python-lib]to install and add it to thepyproject.toml - Use
deactivateto exit the poetry environment activated by thepoetry shell - Use
poetry run flake8to run something without activating the environment - Use
poetry show --treeto show the dependencies and its internal dependencies too - Use
poetry show --latestto show libs that can be updated
📦 Package Management with Pip-tools
🚧 TODO
You can help here!
📂 Backend structure & organization
🚧 TODO
You can help here!
📂 Frontend structure & organization
🚧 TODO
You can help here!
🤡 Frontend using API MOCK
🚧 TODO
You can help here!
🚀 Build, CI & Deploy workflow
🚧 TODO
You can help here!
✨ Contributing
🚧 TODO
You can help here!
Created with ❤️ by Roger Camargo